
Is Engraving at Home Safe? Everything You Need to Know Before You Start

If you're creative, you may have considered engraving. We don't blame you – engraving is a fun hobby where you can turn even the most ordinary materials into beautiful gifts. For example, a glass can become a stunning wedding present and a bamboo coaster makes a wonderful housewarming gift. But if you've never tried it before, you might be wondering: is engraving at home safe? And can I do it in my kitchen or my garage?
In general, engraving is a safe and fun hobby, especially rotary engraving. The risks people worry about most, such as breathing in dust and eye irritation, are real, but they're also easy to manage once you know what to do. There are a few simple precautions to take that will prevent accidents and protect your health in the long run.
Here's our ultimate safety guide on engraving at home, from the gear you need to material-specific advice, so you can start creating with confidence.
Is Engraving at Home Actually Safe?
Yes, for the most part, engraving at home is safe. If you're using a handheld rotary engraving pen, then this is similar to other power tools you can find at home, such as a drill or a detail sander. Because of this, the risk level is the same. This doesn't mean engraving is entirely risk-free, but as long as you're careful and follow a few basic rules, this hobby is far from dangerous.
When is Engraving Not Safe?
A few things can make engraving not as safe as it could be. A lot of the time, it's how you approach the engraving process. The same engraving pen could be risky in one person's hands, but perfectly safe in another's, depending on if they follow the right safety precautions. This includes wearing safety glasses, making sure their workpiece is secure, keeping their workspace clean, and paying attention as they're working.
Another thing to be aware of is material toxicity. The type of materials you choose to engrave can have an impact on your safety. This is because engraving creates dust, which can be harmful or even extremely dangerous and toxic. Materials to be wary of include:
- Glass
- Stone
- Plastic (especially PVC)
- Copper
- Brass
- Other treated materials
- Wood
- Bone
However, just because these materials can release harmful dust, it doesn't mean you can't engrave with them. It's just important to follow the proper safety precautions (but more on that later).
Is Home Engraving Safer Than Other Hobbies?
Whether home engraving is safer than other hobbies depends on the hobbies in question. For example, home engraving is likely to be much safer than hobbies which use extreme heat, such as glass blowing.
A few things work in your favor right out of the gate:
- There's No Open Flame - When you compare engraving to something like soldering or metalwork, it's safer. This is because you're not working with a fire source.
- There's Exposure to High Voltage - You just need to plug your handheld engraver into a standard outlet. There's no need for a complex laser or CNC (Computer Numerical Control) setup.
If you've ever used a power drill or a rotary sander for a home DIY project, you'll likely already understand the general risk that engraving falls into. However, it's also worth noting that engraving tools have a higher RPM, at around 5,000 to 35,000, which makes them ultra-high-speed tools. To put this into perspective, an average drill will have an RPM of around 2,000 to 3,000. This is why you still need to be careful and have a steady hand when using them.
What Can Make Engraving Risky?
Engraving comes with some risks, but they can be easily avoided if you're aware of the following mistakes:
- Not wearing eye protection, such as safety glasses, while you're working with any rotary or laser cutting tool.
- Not wearing a mask, which means you end up inhaling particles from glass, stone, or treated metals.
- Leaving a running tool unattended near kids or pets.
- Engraving an unknown or coated material without checking what it's made of first.
You don't need expensive equipment to avoid these mistakes. You just need to make safety part of your engraving routine. Many trusted engraving tool or hobby brands will also sell a safety kit that you can purchase in addition to the tool, which usually has everything you need to keep you safe while working.

How to Make Safety Part of Your Routine
Safety Gear You Need Before You Start
Wondering how to start engraving ? You need this safety gear first.
Eye Protection
Normal, regular glasses aren't good enough to keep your eyes safe. When you're engraving, dust and chips can fly at you from all angles, which is why you need safety glasses or goggles that fit snugly to your face. You can use standard safety glasses that are rated for dust and debris.
However, if you decide to try laser engraving, then you'll need specific, laser-safe glasses. You need to match these glasses to your machine's wavelength to keep your eyes safe while you're working.
Dust and Fume Protection
A basic dust mask should be enough to keep you safe when working with most materials. If you're trying glass, stone, or metal engraving, we recommend investing in a N95 respirator, as this type of mask filters much finer particles than a paper mask.
Regardless of the materials you use, make sure your workspace has some airflow. Even a cracked window can provide some ventilation while you're engraving, so dust particles don't settle back into the air you're breathing. We don't recommend using a desk fan while you're working. This is because a fan will just blow particles around the room and into the air all around you.
Safety Kits
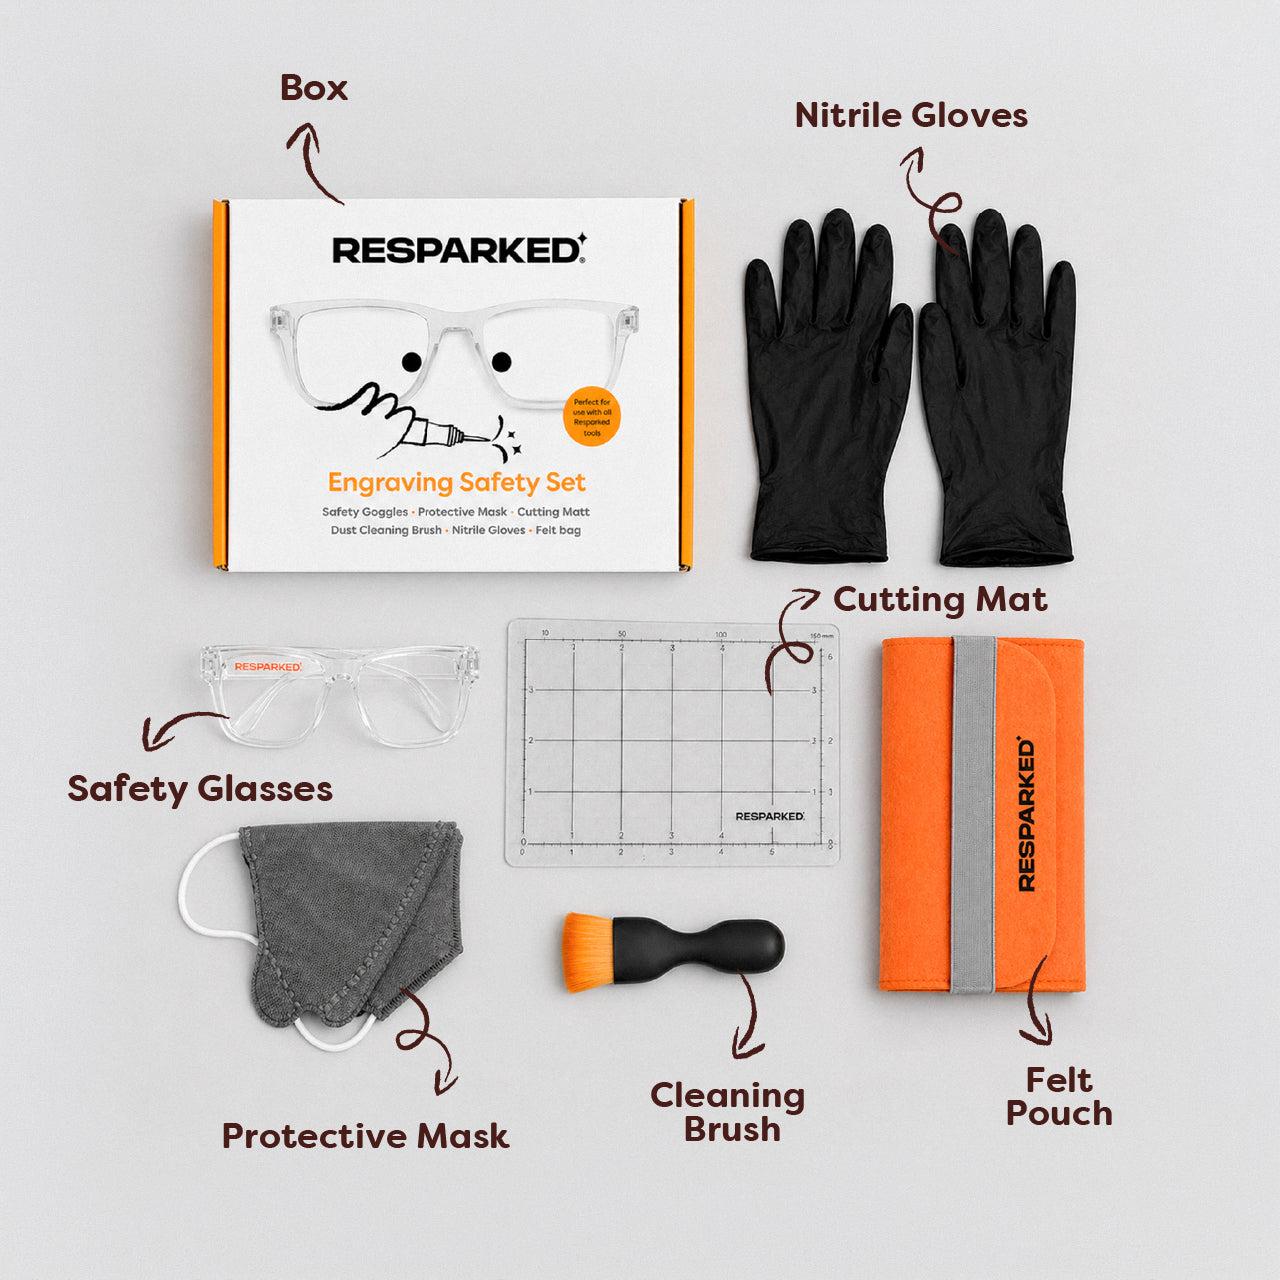
If you want to make sure you're truly safe while engraving, some brands (like us!) offer safety kits that have everything you need. Our safety kit is designed for safe, stress-free engraving, so you can let your inspiration flow without worrying.
Our kit includes:
- A protective mask to reduce dust inhalation
- Lightweight and impact-resistant safety goggles
- Nitrile gloves that will keep your hands protected and comfortable while you work
- A cleaning brush to get rid of dust and debris
- A cutting mat, which is designed to protect your work surface
- A felt storage bag that will keep all your tools organized
Setting Your Workspace Up for Safety
Setting your workspace up properly will reduce the likelihood of accidents and make your creative process much easier. We recommend investing in a non-slip cutting mat that you can slide underneath your project as you work. This will stop the material from slipping and causing an accident.
You also need direct lighting. The darker your space is, the less likely you are to see your work surface, which may also lead to accidents.
How to Engrave Safely: General Rules for Every Material
Regardless of the material you're working with, whether that's wood, glass, stone, or metal, there is a certain set of rules we recommend following to keep your sessions safe.
Before You Start
When inspiration strikes, many of us creatives love to jump straight into our projects. But when it comes to engraving, it's worth spending a few minutes to prepare. Here are a few steps to follow before getting started:
- Test Your Engraving Tool on Scrap Material - Using practice material before you start can help get you used to the tool and stop those initial, frustrating mistakes. This is essential if you've just invested in a new engraving tool or you're a complete newbie. It’s also worth practicing if you haven't engraved for a while, as it'll help you get back into the swing of things before working on the actual piece.
- Make Sure to Match Your Bit to the Material - You can't use the same bit for every project. If you're engraving wood, then you need wood carving bits , and if you're engraving stone, you'll need grinding bits . If you're working with multiple materials, we recommend investing in a drill bits bundle , so you'll have everything you need.
- Start Your Engraving Tool at a Lower Speed - A good quality tool will feature multiple speed settings. Start at a lower speed, as you can always increase it when you're comfortable using the tool.
While You're Working
Your prep is important, but using good habits during the engraving process matters just as much.
- Work With the Tool, Not Against It - You want to let the tool's speed do the work. Don't press harder, as this won't speed things up - it will just increase the odds of a slip or accident. Be patient and take it slow, and you'll end up with a safe process and results you’ll absolutely love.
- Take Short Breaks - This is important to give your hand a rest. But we also recommend taking a break if the tool you're using starts to feel hot. Overworking the motor is one of the most common beginner mistakes, but taking the time to let it cool down will actually extend the lifespan of the tool.
After You're Done
It's also important to follow safety advice once you've finished your project and you're cleaning up.
Make sure to clean both your piece and your workspace thoroughly. If you've been engraving glass or stone dust, use a damp cloth to clean away debris and dust instead of sweeping or vacuuming, which can send fine particles back into the air.
If you live with kids or pets, make sure to store away your tools and materials in a secure place where they won't be able to reach them.
How to Engrave Specific Materials Safely
How to Engrave Stone Safely at Home
Stone is a fantastic material for your projects. You can make coasters, small keepsakes, and so much more. However, it's important to be careful because cutting into stone will produce fine crystalline silica dust, which is more dangerous to breathe in than the dust that comes from other materials like wood or glass.
If you're using stone for a small project, you don't need to be alarmed. However, if you're working on a large project over many sessions, or stone is your go-to material, you need proper protection. We recommend investing in a N95 respirator instead of a basic paper dust mask.
Following safety precautions will ensure you can engrave this surface without worry.
Best Practices for Engraving Stone
- Try to work outdoors or near an open window whenever you can. This is because airflow will carry any particles outside, which will reduce the buildup of dust.
- When you're working with diamond-tipped bits, use a light touch. They're designed for hard surfaces, so it's best to let the bit's hardness do the cutting rather than pressing harder into the material to compensate.
- Clean your piece and surface with a wet wipe or a damp cloth after you've finished every session. Doing this is better than blowing dust away or letting it settle and dry out, which means it will likely become airborne again later.
The Type of Stone You Use Makes a Difference
Natural stone and engineered stone behave differently. Engineered stone (like quartz, often used on kitchen countertops) actually creates more of a hazard compared to the natural variety. This is because it has a higher level of crystalline silica, at 90% or 95%. In comparison, natural stone contains only about 30% to 50% crystalline silica.
If you don't know what type of stone you're using, treat it with the same caution you'd give any material you can't fully identify. That means proper ventilation and extra respiratory protection.
How to Engrave Glass Safely at Home
Glass is one of the most popular engraving materials, and for good reason. It makes a wonderful personalized gift, whether you're engraving glass bottles or wine glasses. If you're interested in engraving this material, it's important to take extra care.
Why Glass Dust Needs Extra Care
Glass engraving creates sharp, fine dust that, when left to drift around your workspace and inhaled, can irritate your lungs. This is why it's important to protect yourself and keep your workspace clean. You never want to sweep or blow away glass dust, as this will actually redistribute the particles instead of getting rid of them.
Step-by-Step to Safe Glass Engraving
- Start by cleaning and drying the glass before you start to get rid of any oils or fingerprints.
- Place your piece on a non-slip surface. If you're working on something with an awkward shape, like a wine glass or bottle, tape the edges.
- When you're working with glass, use ball-tip diamond bits, as this will give you controlled, light passes compared to pointed bits, which are more likely to slip or chip the surface.
- Wipe dust away with a damp cloth as you go. This will keep your view of the design clear and prevent buildup.
- Once you're done, clean your work surface with a damp cloth or wet wipes to clear away the dust and debris.

Is Engraving Safe for Kids and Teens?
Rotary engraving is a great hobby for creative kids and teens. However, because they'll be using a handheld power tool, it's important to supervise them – especially if younger children are engraving. We recommend using softer, easier materials to get your child used to engraving, such as leather or wood, and then move on to more difficult materials like glass.
Just as important: Don't leave a running tool unattended around younger children or pets, even for a moment.
Rotary Pens vs. Lasers vs. CNC: Does Your Tool Change the Safety Rules?
A quick search on Google will bring up endless articles about laser engraving, but most beginner engravers will actually start with rotary engravers. If you're wondering whether the tool changes the safety rules, we've got you covered. Here's how the three most common options compare.
Handheld Rotary Engraving Pens
With rotary pens or engraving pens, there's no laser involved. However, these pens move fast, with some getting up to speeds of 35,000. An accidental slip can still cause an injury, which is why it's important to take your time and work carefully, especially if you're a beginner. You also have to manage dust from the materials with face masks, as covered earlier in this guide.
However, you don't need to install a fume-extraction system or a complex enclosure. All you need is an engraving tool, a clean workspace, and your own creativity.
Laser Engravers
If you're working with laser engraving tools, you need to consider different safety measures. The laser beam itself is dangerous, so it's important to protect your eyes. You need specific laser safety glasses that will match your laser's wavelength. Laser engraving also produces smoke and particles while cutting, so it's important to set up a fume extractor.
The last thing to know is never to leave a laser cutter unattended. You may be working with flammable materials and, because of the amount of heat it generates, laser engraving poses a real fire risk. We recommend keeping a fire extinguisher handy just in case. Safety standards recommend using a CO2 (Carbon Dioxide) fire extinguisher or a Clean Agent extinguisher.
CNC Machines
A CNC machine is a high-speed rotating cutting tool. Some setups feature a liquid coolant system to manage the heat they give off. They're high-power, which means they won't stall if a bit gets jammed; instead, they can snap bits or shatter workpieces. They're fantastic for advanced projects, but come with a learning curve and, because of this, they're a good choice for experts.
Which Engraving Tool is Best for Beginners?
A rotary engraving pen is almost always the best tool for beginners. There's no complex setup – all you need is the tool and your project (and some practice materials to help you get the hang of things). In terms of safety and workflow, it's always best to purchase a good-quality engraving pen, as opposed to a cheap $10 option.
The Resparked Customizer Engraving Pen is easy to use and perfect for beginners. It comes with a charging cable, wood carving bits, diamond bits for a variety of surfaces, a user manual, and practice materials.
Your Home Engraving Safety Checklist
If you only remember one section from this guide, make it this one. Keep this list nearby for every project you work on, so you can stay safe while you're inspired:
- Wear goggles and a dust mask or respirator during every single session
- Secure your material with a clamp, vice, or non-slip mat before you start
- Match your bit to your material:
- Ball tips for glass
- Diamond tips for stone
- Don't press harder - let the tool's speed do the work
- Take breaks when you need to
- Clean up dust with a wet wipe or damp cloth instead of a sweeping brush or vacuum
- Supervise kids and teens
- Store your tool and bits safely away when you're not using them
Frequently Asked Questions
Can I Use a Laser Engraver Indoors?
Yes, you can use a laser engraver indoors. However, you need to follow safety guidance for your own protection. The laser lens vaporizes materials in order to engrave them, filling the room with toxic gases and smoke. In order to use a laser engraver safely indoors:
- You must use an enclosure, otherwise known as a "smoke box." This is a sealed fire-retardant enclosure that will trap the hazardous fumes and dust.
- You must vent the air outside using a window vent or a true fume extractor.
You'll also want to ensure you've set up in the right place. Don't engrave in your kitchen, living room, bedroom, or anywhere else you spend most of your time. Go for the garage, basement, a workshop, or even a spare room.
Can a Beginner Use a Laser Engraver?
A beginner can use a laser engraving tool, but because lasers have a real risk of fire, we recommend starting with a rotary tool if you're interested in getting into engraving.
Do I Need a Respiratory System, or is a Regular Dust Mask Enough?
If you're engraving wood and plastics, you only need a basic dust mask. However, if you're engraving materials that produce sharper or finer particles, like stone and metals, it's good to invest in a higher-rated respirator, as this will give you better protection from harmful dust.
Is a Rotary Engraving Pen Safer Than a Laser Engraver?
Yes, a rotary engraving pen is safer than a laser engraver, especially if you're a beginner. This is because a rotary tool doesn't use a laser light, which can hurt your eyes and release harmful fumes. However, that doesn't mean you shouldn't be careful when using a rotary tool. The main hazards when using a rotary engraving tool are dust and accidental slips. Wearing basic protection and setting up correctly will ensure you're using your engraver safely.
Can Kids or Teens Safely Use an Engraving Pen?
Kids and teenagers can use an engraving pen, as long as an adult is supervising them. In terms of materials, we recommend using soft or easier materials, such as leather or wood, before moving onto more difficult materials like glass or stone. Never use the engraving tool unattended around younger children.
What Materials Should You Never Engrave at Home?
When engraving, it's best to avoid cutting PVC, vinyl, or unknown coated plastics, as some release toxic fumes when they're cut or heated. If you're not sure what a material is made of, skip it entirely. We also recommend purchasing materials from trusted brands, like Resparked.
Do I Need Special Ventilation for Hand (Non-Laser) Engraving?
No, you don't need the fume-extraction setup or robust ventilation a laser needs, but working near an open window helps clear dust during glass, stone, or metal marking sessions, especially for longer projects.
Is Engraving Dust Dangerous Long-Term?
If you engrave as a hobby and you use proper PPE, then you're at lower risk. However, when you repeatedly expose yourself to dust particles without wearing a mask or goggles, this can be dangerous, especially when you're inhaling silica dust from stone. That's why it's important to stay protected.
Is it Safer to Engrave Indoors or Outdoors?
You can engrave both indoors and outdoors. If you're working with dustier materials like glass or stone, then working outdoors or in a well-ventilated garage is ideal. Indoors works fine for natural wood, leather, and most plastics, as long as you're wearing a mask, goggles, and working in a clean, well-lit space.
Conclusion
So, is engraving at home safe? The simple answer is yes, when you're careful and prepare properly. If you're working with a rotary tool, you can easily manage the risks with proper eye protection and a mask. You also want to make sure you're set up in a well-ventilated area.
If you're working with a laser engraver or CNC, then you'll need to take even more care.
We recommend starting with a beginner-friendly rotary pen instead of jumping straight to advanced equipment. Once those habits are in place, you can focus on what makes this hobby so enjoyable in the first place: turning an ordinary material like glass or stone into something personal.