How to Start Engraving: A Practical Beginner’s Guide
So, you’ve seen those beautifully customized wine bottles or intricately detailed metal keepsakes and wondered, "How to start engraving at home?" You’re in the right place! Engraving is a fantastic way to create personalized, custom items that carry a little bit of extra effort and a whole lot of heart. While it might look intimidating at first, the engraving process is something anyone can master with the right tools, a flat surface, and a healthy dose of practice.
In the beginning, it’s all about setting the right expectations. Your skill will build over time as you get used to your engraving tool and how it interacts with different materials. You don’t need to be a master artist to get started engraving; you just need beginner-friendly engraving tools and kits to take the guesswork out of your first project. With a steady hand and the right technique, you’ll be turning an ordinary object into a work of art in no time.

Key Takeaways
- Beginners can build proficiency by practicing on flat, soft surfaces before attempting to engrave 3D objects or harder materials.
- Using a workbench clamp or vice to secure your workpiece ensures stability and prevents errors during the engraving process.
- Always wear safety goggles and a dust mask to protect yourself from hazardous dust, flying shards, and toxic fumes.
- A high-speed rotary tool paired with small diamond-tipped bits is necessary for executing fine, detailed lines on small items.
- Quality engraving requires adapting your design to the object's shape while mastering a range of cuts in length, width, and depth.
What You Need to Start Engraving as a Beginner
You don't need a massive workshop, but you do need a few specific items to ensure a smooth job. These include:
A Reliable Engraving Tool That’s Easy to Control
For most home hobbyists, a compact engraving pen is the gold standard. It feels natural in the hand, much like a pen or a pencil.
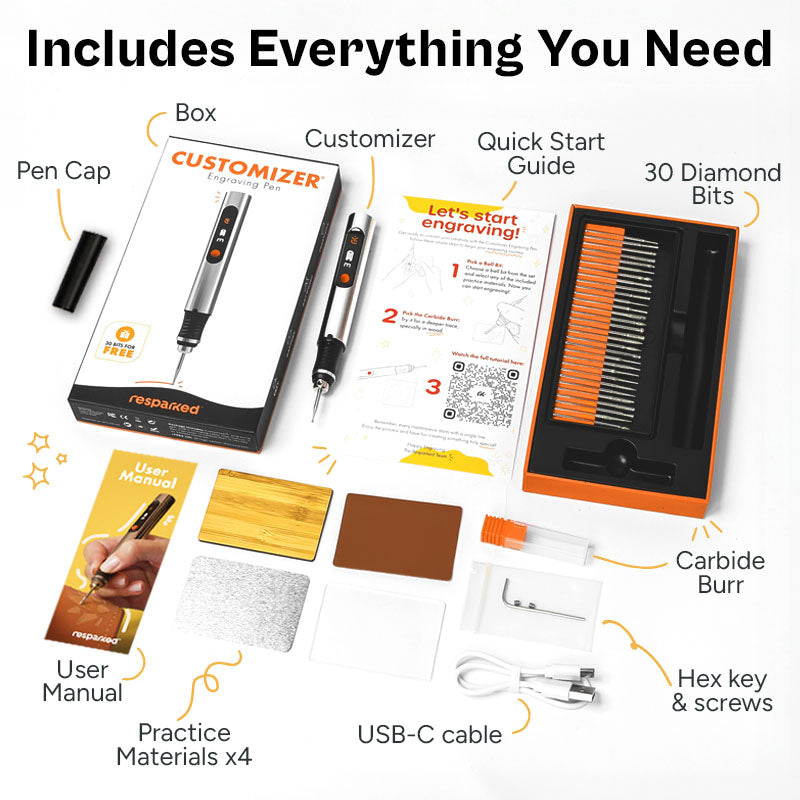
- The Customizer™ Engraving Pen: This is a fantastic choice for beginners. It’s a lightweight, cordless engraver that works on metal, glass, wood, and plastic.
- Versatility: It includes 30 diamond burs for varying levels of detail.
- Adjustable Speed: With a speed range from 8,000 to 21,000 RPM, you can dial in the exact setting needed for your material.
Supporting Tools That Improve Accuracy
Beyond the drill itself, consider these essentials:
- Workbench Clamp or Vice: This is essential to secure the object and prevent it from moving, which helps keep lines straight.
- Templates: These guide your hand and help you create consistent patterns.
- Cleaning Supplies: Always keep rubbing alcohol and Q-tips nearby to clean the surface of dust or ink as you work.
Engraving Starter Kits Make Learning Easier
A starter kit, such as the Customizer Engraving Kit (Special Edition), is great because it includes everything from the engraver to the practice materials. You won't have to spend hours researching which burr size fits which drill; it’s all ready for your first project.

Customizer Engraving Kit
Special Edition - Limited Curated Experience
Shop NowCustomizer Bits
Customizer Bits give you the exact attachment you need for any project on your crafting bucket list.
- The Ultimate Bits Bundle is a full set of precision tools for all your engraving needs. It includes 5 wood carving bits, 5 tungsten bits, 5 stone grinding bits, and 5 finishing bits.
- The Stone Grinding Bits are perfect for creating deep, clean lines on stone to give your work a professional look.
- You can shape and carve wood with plenty of power and precision, with the Heavy-Duty Carving Bits.
Essential Engraving Accessories for Your Projects
Having the right accessories can significantly enhance your crafting experience and improve the quality of your work. From protecting your workspace to practicing your technique, these items are designed to support every stage of the engraving process.
Workspace Protection
- Cutting Mat: Designed to protect your workspace and surfaces while you are crafting.
Stencil Sets for Design Guidance
These sets help you add intricate patterns and personalization with ease:
- Lettering Stencil Set (5 pcs): Used to add clean letters, numbers, and text to projects.
- Nature Stencil Set (5 pcs): Helps create nature-inspired designs.
- Mandala Stencil Set (5 pcs): For creating intricate decorative designs and mandala patterns.
- Christmas Stencil Set (5 pcs): Specifically for holiday-themed projects.
Practice Canvases
Using practice materials is a key step in perfecting your skills before moving on to final or larger pieces:
- Aluminum Canvas (50 pcs): Ideal for practicing on metal surfaces.
- Wood Canvas (3 pcs): Used to build proficiency on natural wood materials.
- Acrylic Canvas (3 pcs): Perfect for learning how to engrave on clear or colored acrylic.
- Bamboo Christmas Canvas: A specialized surface for practicing holiday-themed engravings.
Materials That Help You Learn Faster
Choosing the right materials at the start can make or break your experience.
Easy Engraving Surfaces and Materials for Beginners
For your first post-purchase project, stick to a flat surface. Engraving on a flat panel is much easier than trying to navigate the curves of a box or a round wine bottle.
- Wood: Great for feeling how the tool removes material. Use the Wood Engraving Kit for creating intricate patterns on coasters, customizing wooden kitchenware, or adding a rustic, handmade touch to DIY home decor projects.
- Glass: Excellent for practicing light pressure and fine lines. This Glass Engraving Kit will help you transform ordinary wine glasses, mirrors, or perfume bottles into elegant, personalized gifts with permanent, frosted designs.
- Acrylic: an acrylic lamp engraving kit to etch detailed illustrations or meaningful quotes onto clear panels, which catch the light from the LED base to create a glowing, 3D effect.
- Leather: With a high-quality DIY leather engraving kit, you can add professional monograms to wallets, belts, and journals, giving your everyday accessories a sophisticated, custom finish.
Materials That Might Be Tricky for Beginners
On the other hand, these are some materials that beginner engravers might find hard to engrave:
- Avoid PVC or vinyl at all costs; when these are subjected to heat (especially in laser engraving), they release toxic chlorine gas.
- Similarly, very hard steel or uneven, textured materials will only frustrate you until you have more control over your precision.
How to Prepare Before You Start Engraving
Success is 90% preparation and 10% execution. Here are some things you can do to make sure you’re ready.
Set Up a Clean and Stable Workspace
Your surface must be clean. Use rubbing alcohol to remove any oils or wax. Ensure you have strong lighting so you can see every detail of the image you are trying to create. A cluttered box of tools will only distract you; keep your Q-tips, bits, and water within easy reach.
Secure the Material for Better Control
Always use a clamp or vice. If you try to hold the object with your palm while engraving with the other hand, you risk injury and shaky lines. Securing the work allows you to use both hands to control the engraving pen, leading to a much better final product.
Plan Your Design Before Cutting
Don't go freehand yet! Use a pencil to sketch your pattern or a print to trace the outline. You can even use a template to ensure your calligraphy is perfect. This drafting stage is where you plan the scale and spacing, ensuring the art fits the shape of the item.
How to Engrave: A Step-by-Step Process
Follow this process to get started engraving:
- Practice Before Starting: Use the practice materials included to test your speed and pressure.
- Outline Your Design First: Lightly engrave the outline of the shape. This defines the boundaries of your project.
- Build Depth Gradually: Make multiple light passes rather than trying to cut deep all at once. This technique helps keep the tool from jumping.
- Adjust Settings: If the metal is getting too hot, lower the speed or apply a little bit more lubricant.
- Add Detail and Shading: Once the main outline is done, use your smaller bits for fine detail and shading.
- Pause and Review: Take breaks! It allows the drill to cool and gives your eyes a rest so you can spot any image errors early.
Techniques That Improve Your Results
Once you get the hang of the engraving tool, you can start playing with advanced methods.
Control Pressure and Movement
The angle of your graver or bit is key. For a wider furrow shape, you might change the tilt. Keep your grip relaxed; if your palm is sweating, you're gripping too hard. Let the friction of the burr do the job.
Create Depth and Dimension
To make an object look 3D, vary the depth. Deeper lines catch more light and create stronger shadows. You can use a larger bit for the deep parts and a fine point for the edges.
Add Shading and Texture
Shading in engraving is about density. Tightly grouped lines (cross-hatching) create dark areas, while widely spaced dots create highlights. This technique is what separates a simple drawing from a professional engraving.
Safety Tips Every Beginner Engraver Should Follow
Engraving generates dust, sharp shards, and sometimes fumes. Safety is not optional.
Use Personal Protection While Engraving
Always wear safety goggles to protect your eyes from flying metal or glass bits. A dust mask is also essential, as inhaling fine plastic or glass particles is hazardous.
Manage Dust, Debris, and Fumes
Work in a well-ventilated area. Use a damp cloth or Q-tips to wipe away debris frequently so it doesn't build up and obscure your image.
Keeping Your Tool in Good Condition
Avoid overworking the motor. If the engraver feels hot, take breaks. Regularly replace worn bits; a dull burr requires more pressure, which leads to accidents.
Simple Engraving Projects to Build Skills
Not sure where to start? Try these:
- Coasters: Use a flat surface of wood or slate to practice your outline work.
- Photo Frames: Engrave names or dates on the glass or metal border.
- Wine Bottles: Once you’re comfortable, wine bottles make amazing, high-end gifts. Use a template to stick to the curved surface.
Common Beginner Mistakes (and How to Avoid Them)
- Too Much Pressure: The biggest mistake most people make when they have just started engraving is pressing too hard. They treat the engraver like a chisel instead of a pen. If you fight the drill, you will lose precision.
- No Practice: Always use extra material first. Improvement comes from structured practice. If you just doodle without a plan, your technique won't stabilize. You need to practice consistent lines, circles, and calligraphy on a sheet of metal or a flat surface of wood. Reviewing your mistakes after each attempt is the only way to make a difference in your next project.
- Dirty Surfaces: Stains or oils can cause the bit to slide. Use rubbing alcohol.
- Ignoring Speed: High speed on plastic might melt it; low speed on steel might not cut. Experiment to find the sweet spot.
- High-Quality Tools: When engraving, your tools are your best friends. Low-quality tools often vibrate excessively, leading to uneven or shaky lines.
- Failure to Plan Your Design: Many beginners skip the drawing and planning stage, leading to uneven spacing. Drafting your design with a pencil or ink on the surface before you ever touch it with a drill prevents misalignment. Using a template or a print to trace your image can significantly improve the quality of your work.
Frequently Asked Questions
Do You Need Expensive Tools to Start Engraving?
No! A simple nail drill or a dedicated engraving pen like the Customizer is very affordable and perfect for getting started engraving.
What Is the Best Material for First-Time Engraving Projects?
A flat surface of glass or a soft metal plaque is best. Both materials provide a consistent response that helps you learn engraving faster.
How Long Does It Take to Learn Engraving Basics?
You can understand the engraving process in an afternoon, but mastering the art of hand engraving and fine detail takes months of consistent practice.
Can You Engrave Without Drawing Skills?
Absolutely. Many people use a print, trace it onto paper, and then use that to create an outline on the metal. Templates are also a huge help.
What Speed Should an Engraving Tool Be Set To?
It depends on the material. Harder materials like steel often require a slower speed with more precision, while glass can handle higher speeds with light pressure.
How Do You Avoid Mistakes While Engraving?
Plan your design, use a clamp, and take breaks. Most mistakes happen when you are rushed or the object isn't secure. Plus, make sure you choose the right bit!
Is Engraving Safe to Do at Home?
Yes, provided you wear safety goggles, a mask, and work on a stable flat surface.
What Are the Easiest Items to Engrave for Beginners?
Flat ornaments, coasters, and metal nameplates are the easiest to handle.
Conclusion
Engraving allows you to unleash your inner artist and create something truly unique. Whether you want to customize wine bottles for a wedding or add a fine detail to a metal keychain, the key is to start simple. By focusing on control, using a template, and choosing a reliable engraving tool like the Resparked Customizer, you’ll find that your skills grow with every project. Every master engraver started with a shaky line and a sheet of extra material. Keep at it, stay safe, and enjoy the process of making your mark.
